In the beginners section we'll start to diffrence the eyes by three factors:
-shape
-iris type
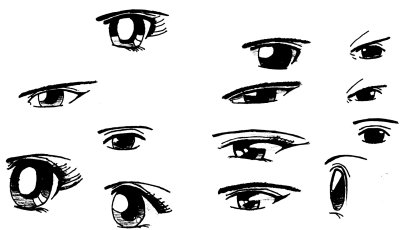
-reflection typeBut before teaching how to difference the eyes or create new types I'll show all the eye types you will see in this section:
So, look at that picture and think about every eye type you see. Look at the irises, reflections and shapes of those eyes. You can see three diffrent shapes: -flat eyes
-square eyes
-thin eyesBut which one is which? Here I've classified them and written some comments(when they are use, where you could have see'em).
The first class are the flat shape eyes:The next I'll classify the iris types. I differnce four iris types:They are used when trying to make the character look close to reality. They are often very complex and not easy to draw. Their typical sign is a small eyelash on the side opposed to the nose. This eye lash varies in size on women eyes and man eyes. The eyebrow size of course also varies in size depending the sex. You could have seen this style eyes in Loddoss War OVA. The second class eyes are the most commonly used-square shape eyes:
I know they aren't realy square shape, but they have about the dimensions(as high as wide). Most often used feature on them is the very large iris. I've written about these style eyes in the novice section. You could have seen this style eyes in Sailormoon, Gunsmith cats, etc. The third class eyes are the thin eyes:
They are often used when trying to make the character look childish(like in Pokemon). The iris hasn't got the apple in the center. Well acording to the picture on the beginning of this section some eyes I haven't classified. Now I'll correct this error.
The fourth eye class I call the Miyazaki class. Because that these eyes haven't got a typical shape I call them simply after Hayao Miyazaki who uses them in his anime:
These eyes consist only out of two lines and the iris has a simple reflection, but I'll explain the various reflection types later. This eye type is, as I already mentioned above, used in Miyazaki movies such as: Mononoke hime, Hotaru no haka, etc.
-round iris
-thin iris
-point iris
-free shape iris
The first class the round iris is mainly used in flat shape eyes and in Miyazaki eyes(not Miyazaki's eyes).The second thin iris eyes is used in thin shape eyes. The point irises are again used in flat eyes(but there isn't a rule that they can't be used in other shape eyes), they consist only out of one small dot, that makes character look bad-often used for badguys(like Ashraam from Loddoss War, or Ten Shin Han from Dragon Ball). When this iris is used the eye doesn't have a typical manga eye reflection. The last class are the free shape irises. They are used in square type eyes. They often have rectangle-like shapes or whatever shape you want.
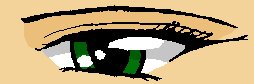
The thing that makes manga eyes look so nice are the reflections in the eyes. Here I'll show some reflection types. Learn how to apply them(it shouldn't do a problem learning that) and later I'll explain how to invent your own eye types.
Every reflection type consists out of several elements that are placed into the eye to achieve an specific efect. Here I'll show some of those elements:
I difference reflection elements into three categories:
-the main reflection(this reflection defines from where the light comes)
-the auxiliary reflection(this element can be removed- it's not nescessary to have it in the eye)
-the advanced light refraction(this element I recomend to use only when you've mastered the other categories of reflections-it's
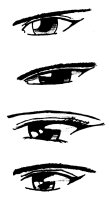
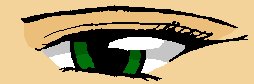
not easy to apply)The first and major part of every reflection is the main reflection. It's usualy represented by a circle, but it musn't be only a circle. The position often varies depending on drawing style. Here's an example:
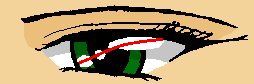
The position of the reflection is within the iris and she coveres a part of the apple. This reflection type you could have seen in Sailormoon. Another position of the reflection you can see here: 
(The main reflection is colored yellow)The reflection is now pushed far more out of the iris(it breaks through the iris in a small point at the left edge-which results in that the iris has a small hole as you can see here) The reflection covers the eye color. This is visible on this picture, where teh reflection is pushed even far more out of the iris. With this picture understood we can move on to the next reflection type-the aux. reflection. The aux. reflection is used only to make the eye look brighter and fill out the empty places on it. I don't think I must explain you more. Simply put a small white circle somewhere onto the eye to improve it's look.
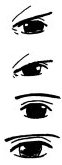
The advanced light refration isn't that simple to plsce correctly as the main reflection. But I'll get right to the point. The light refraction is usualy represented by small white circles on the eye placed on the opposite side of the iris as the main reflection. You could have seen these refractions beiing applied on the picture above. The main reflection is the large white part. The refractions are the smaller white circles to the left of it. The refractions often vary at different lighting angles and different different viewing angles of the face. They also define the depth of an eye. In this section we'll learn only the basic light refraction- consisting of the main reflection and the two refration circles. When trying to draw them, draw first the main reflection.
Then place the first refraction circle. At the end place onto the opposite edge of the iris the second refraction circle. Keep in mind, that the reflections are on a line that is bend a bit down. Here you can see it:
Now to how to create your own eye drawing styles. I've thought about placing this part into the otaku manga section, but I think you're good enough to master creating your own drawing style. This of course doesn't mean that you must create your own style.
You only have understand how to do it if you want to. But lets get started.When trying to create your own style eyes you have to choose from of look they should have, or what complexity they should have. Do you want the eyes to have a childish look? O.k. not a problem, then we'll make the eyes big. The best eye shapes for this are the square eyes or thin eyes. If you want the eyes to look angry the choose the flat eyes and you couldn't have done better.
Experimentate whisth the shapes and find out what would be the best one for you. After chosen the shape you'll have to choose the iris type. You of course can place thin irises inyo flat shape eyes, but the end effect will look as pokemon eyes(the faces of Jessie and James have such eyes). But if that's what you want go ahead and use'em. Simply try out new combinations and use the ones you like the most. With the reflections it's not so easy. First think of the look the eyes should have. If you want a character to have happy eyes, then use only the main reflection and maybe that some aux. reflections would be fine too. Or if the character has an unknown past and is always an enigma you should concider using the refractions to make his eyes look deep and hardly to read. The best way to learn drawing your own styles is to try out several combinations and experimentate with the eyes.
Phuh. Done. At last the end of the begginners eye section is here. We'll girls and boys it's up to you what to do now.